Looking for exercises to stop numbness and tingling in your hand?
Then I know this blog post can help!
It’s here you’ll find carpal tunnel relief with two highly effective exercises that are proven to decrease numbness and tingling in your hand.
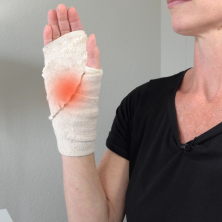
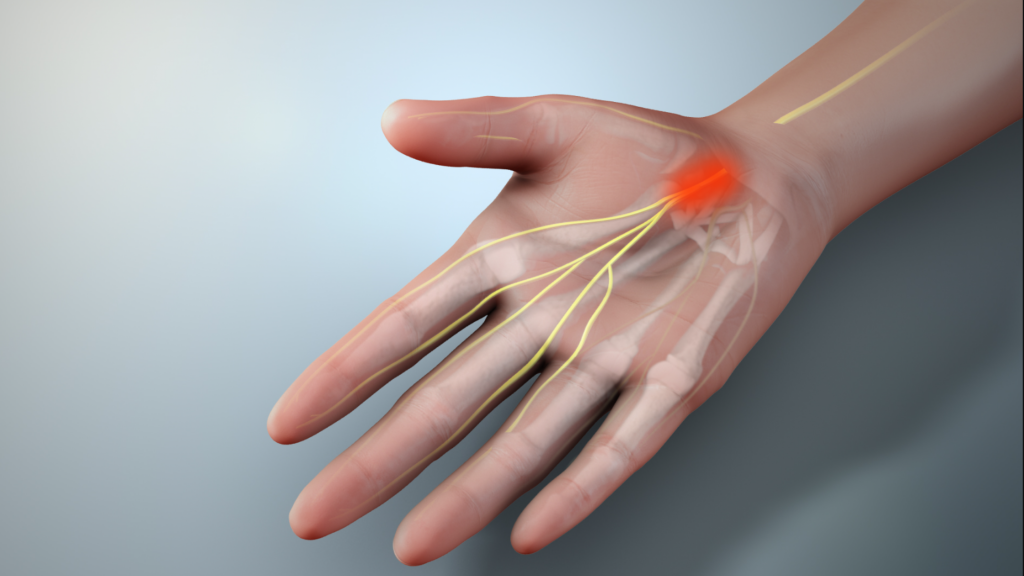
Carpal tunnel syndrome is a compression of your median nerve at your wrist. Common symptoms include a pins and needles feeling to your thumb, index, middle, and half of your ring finger.
Typically, symptoms are worse at night due to swelling or sleeping with your wrists flexed. In fact, one way to stop finger numbness at night is with this comfy Pil-O splint.
Keep in mind, if you have numbness of your small finger and the other half of your finger then you could be experiencing Cubital tunnel syndrome. If that’s the case, try these ulnar nerve exercises instead.
Fortunately, targeted movements can help relieve pressure off your nerves. Ultimately, stopping the numbness and tingling in your hand.
The way to do that is to systematically move your nerve through all the narrow spaces and tunnels in your arm. But you want to do it slowly or you could make your symptoms worse.
Common mistakes to avoid
Most carpal tunnel exercises focus on stretching or strengthening your nerves.
Overstretching can cause more harm than good. So this should be avoided.
Another mistake is moving too quickly through nerve exercises, making an already irritated nerve even more mad. Consider this a reason you’re not noticing improvements of your symptoms.
What makes these different from most carpal tunnel exercises is that you’ll focus on gliding and flossing your median nerve.
FLOSS stands for: Fix, Limit, Oscillate, Slow, Symptom Free
Basically, you want to move one joint at a time, in a comfortable range of motion, slowly and symptom free.
Do these to your hand that is numb and tingling. If you have symptoms on both hands, focus on one arm at a time.
It may be best to follow along as I walk you through step-by-step in this Help for Numbness and Tingling in Hand: Carpal Tunnel Relief YouTube video below.
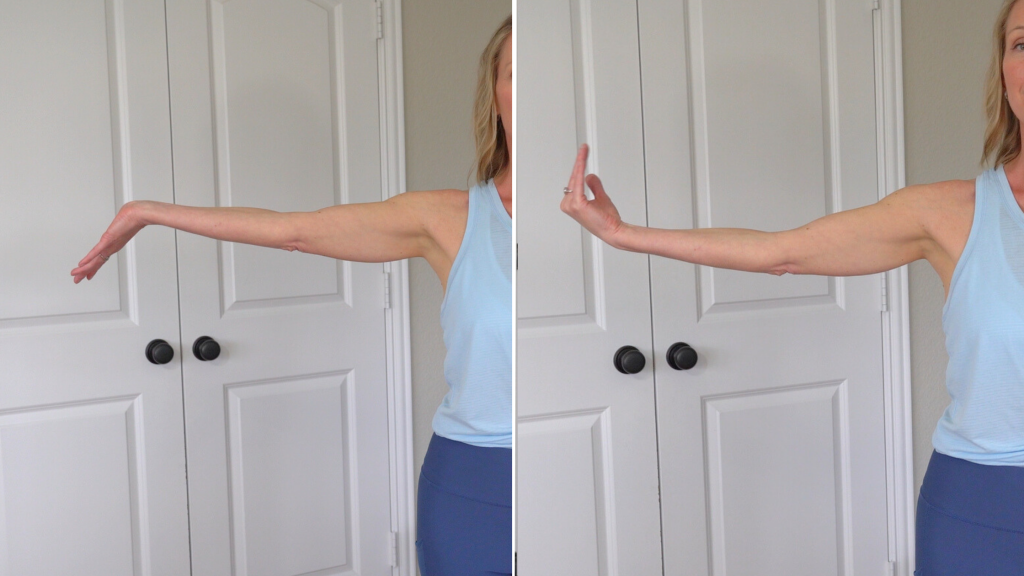
Exercise 1 – Carpal Tunnel Median Nerve Gliding Exercise
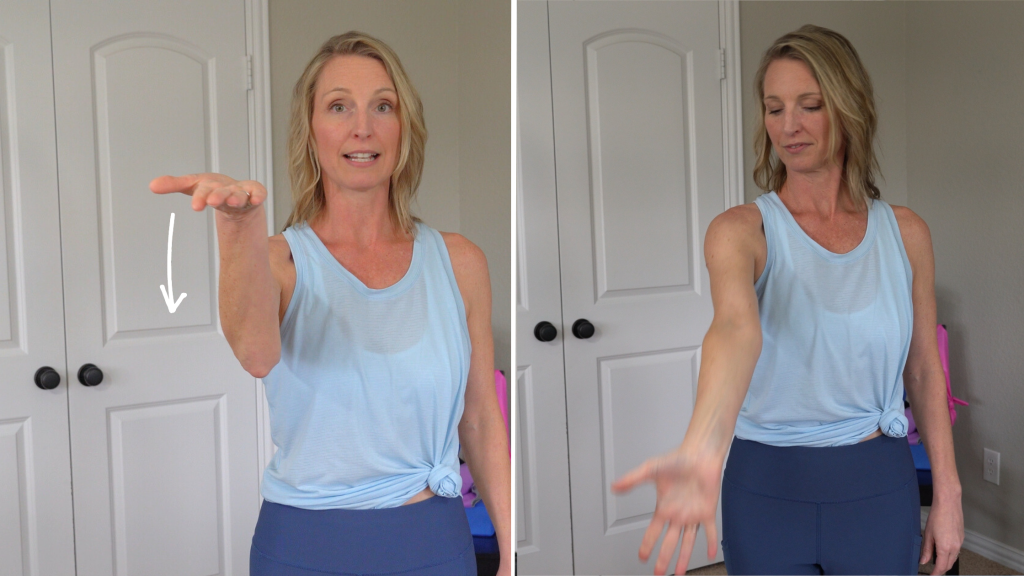
In this exercise, you’ll start with your arm at your side. This places your nerve in a shortened position. Each step will gently move your tendons and median nerve through your carpal tunnel space.
- Raise your hand out to the side, palm is facing outward, and your elbow is slightly bent.
- Bend your fingers into a loose fist.
- Next, move your fingers into a hook fist.
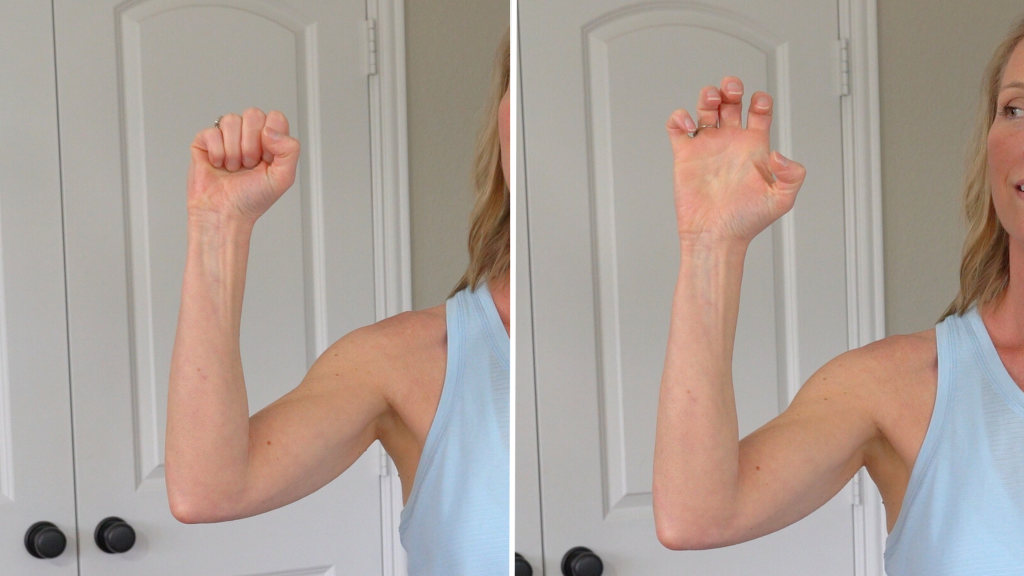
4. Then straighten your fingers and bring your thumb next to your index finger.
5. Extend your thumb out wide.
6. Bend your wrist back, keeping fingers straight.
7. Rotate your forearm, keeping your wrist back in extension.
8. In one big swooping motion, bring your arm in front of you by straightening your elbow, then glide it down by your side.
9. Your ending position should be with your arm back down by your side, or slightly extended behind you.

Aim to do this exercise in one fluid movement.
In exercise 2, you’ll start with the nerve in a shortened position. Each step will slowly introduce more length by adding more joint movement.
Make sure you progress very slowly and only move onto the next step if you’re symptom-free. If you experience numbness or tingling, break down the exercise into smaller steps.
Repeat the exercise 5-10 repetitions, 1-2 times a day.
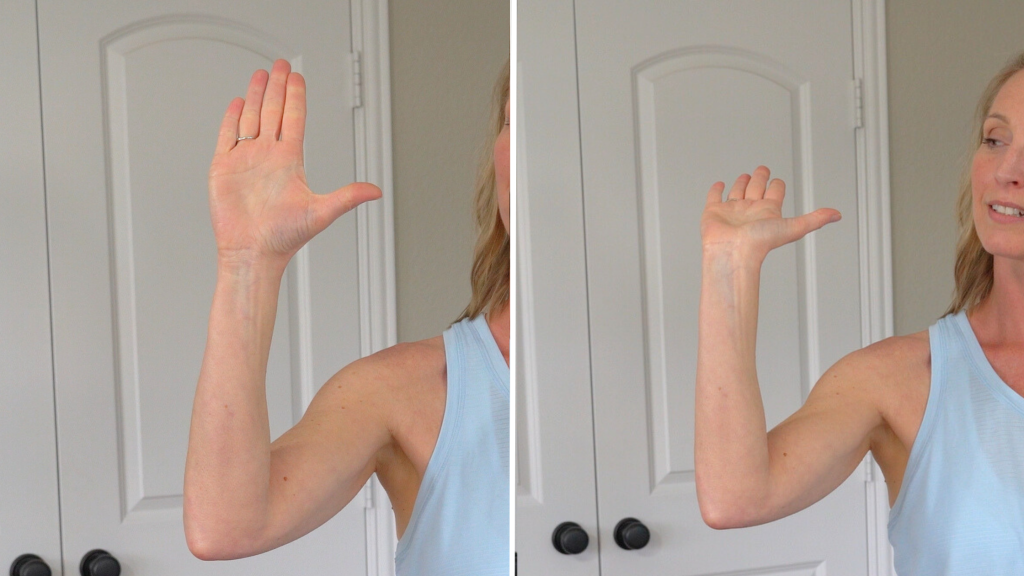
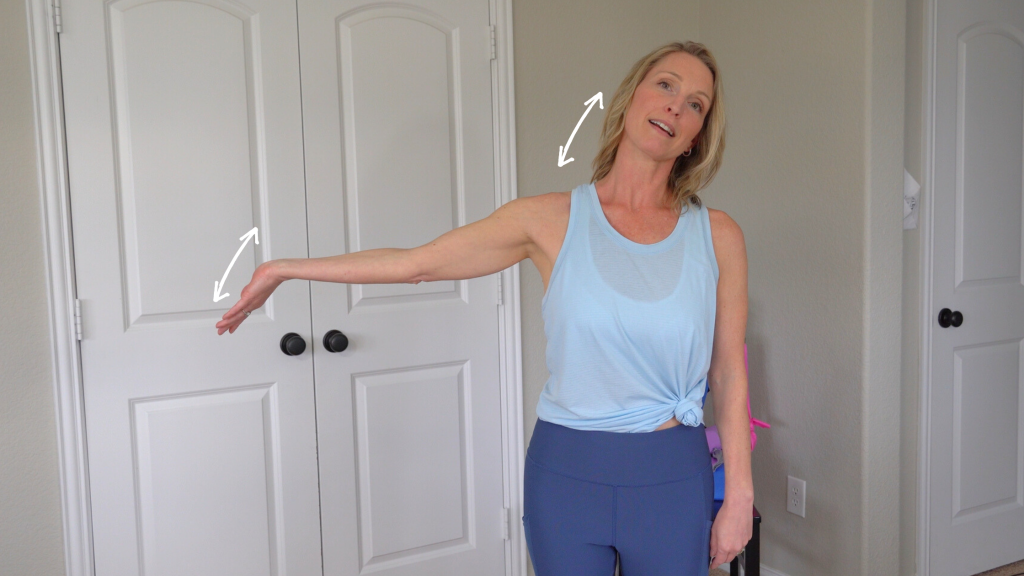
Exercise 2 – Carpal Tunnel Median Nerve Flossing Exercise
- Stand with your arm at your side.
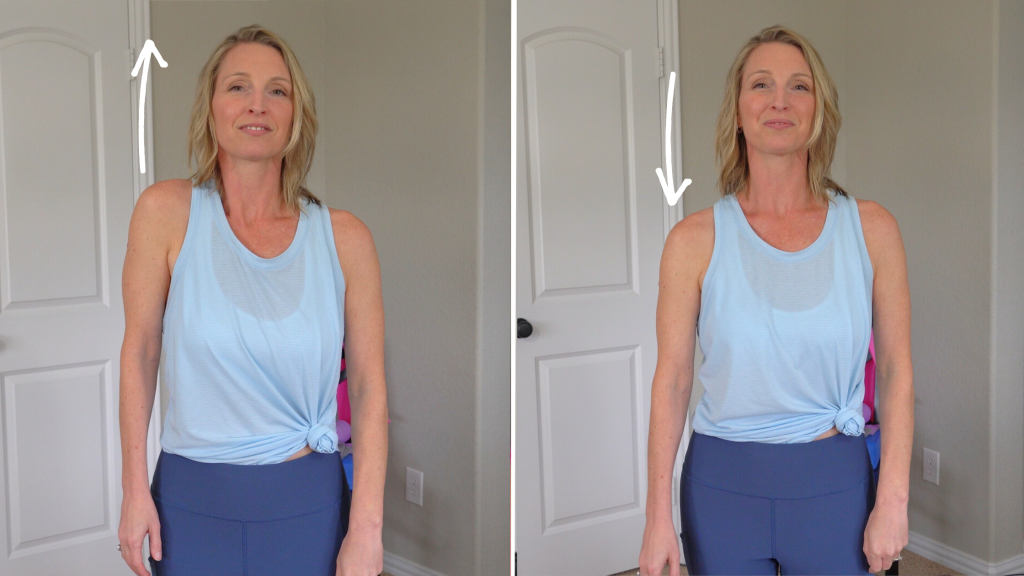
- Shrug your shoulder up and down several times. This movement helps floss your nerve at your shoulder which moves it along your whole arm.
3. Once you feel comfortable, keep your shoulder depressed down. Elbow straight.
4. Turn your hand out, rotating it away from your body.
5. If you do not have any numbness or tingling, start flossing your elbow by bending and straightening in a short arc of motion. Try this several times, to floss the nerve at the level of your elbow.
Slowly floss more joints until you reach the final step.
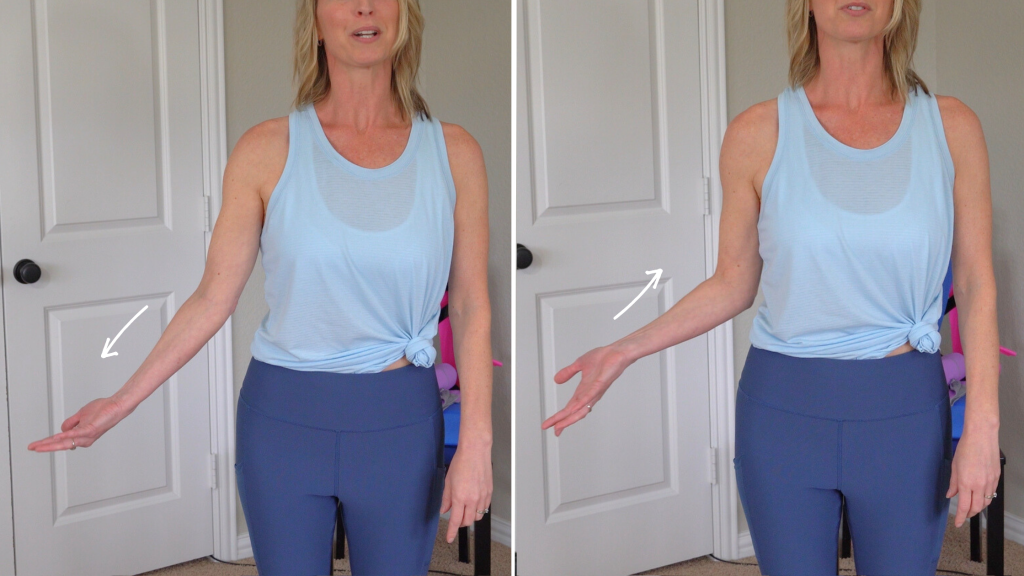
6. Keep your shoulder depressed down, hand turned away from your body, and elbow straight as explained in steps 1-5. Now start flossing your wrist by bending back and forth several times.
Make sure you do not have any numbness and tingling in your hand.
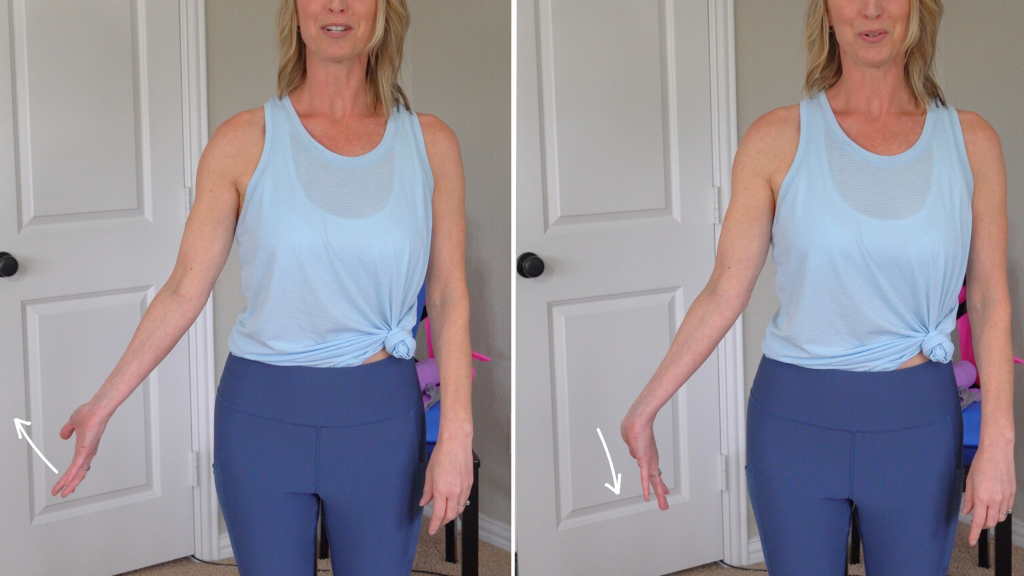
7. Now, lift your shoulder out to the side, keeping your elbow straight. Slowly extend and flex your wrist with your fingers open. Try this a few times to glide the nerve at your wrist, again symptom free.
8. If that is comfortable, keep your arm raised out to the side and wrist extended down towards the ground.
9. The last step is to side bend your head to your opposite shoulder. This will completely lengthen your median nerve from your neck down to your fingertips.
For some people, this step might be too much of a stretch. It’s essential to listen to your body and stay where you feel comfortable.
Work on the individual glides until you’re ready to move onto the next step.
Although, if you made it through each step without having increased symptoms, it’s time to put all that together. Ideally, you want to move in a fluid, rhythmical way.
To summarize exercise 2, depress your shoulder down, rotate your hand out, straighten your elbow, then lift your shoulder out to the side. Now bend your wrist and fingers down toward the ground and bend your head to your opposite shoulder. As long as you don’t have any numbness or tingling symptoms, floss your nerve by moving your wrist and head simultaneously back and forth.
Keep in mind you do not need to bend your wrist and head together. Do what feels good!
Again, repeat the above exercises 5-10 repetitions, 1-2 times a day.
Conclusion
Well, did you notice any decreased numbness and tingling in your hand?
Remember to approach nerve exercises slowly and avoid overstretching in order to find carpal tunnel relief. If you haven’t noticed a big difference in your symptoms, give your nerve some time to heal.
*The content on this page is not medical advice. Try at your own risk.