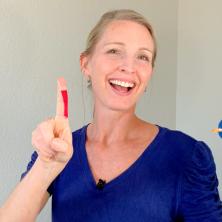
Is your trigger finger locking every time you grip?
Well, my friend, you could be dealing with an annoying case of Trigger Finger. Thankfully, in this article, I’m going to share with you my top 5 trigger finger treatments you are going to want to try ASAP. In order to understand why you should do these trigger finger treatments, let’s briefly discuss what’s happening inside your hand.
I bet you didn’t know that the medical term for trigger finger is stenosing tenosynovitis. In short, there is too much swelling in the sheath that surrounds the tendon. This added inflammation leaves no space for the tendon to glide through the pulley, causing painful catching, locking, and snapping.
Trigger finger can also progressively worsen over time if you aren’t working on prevention. Your finger can get to the point where it locks into your palm. This is when you can’t even manually pull your finger straight.
And when you try, you feel pain. Oh the pain!
If you are a self-diagnoser, by that, I mean you Googled your symptoms…you may want to see a hand surgeon. This way you can make sure you truly have a trigger finger.
Getting the right diagnosis is so important because there are a few other common hand conditions, such as Dupuytren’s contracture and EDC subluxation, that can mimic trigger finger.
Each of these conditions are very unique and require different treatments. In addition, a doctor can tell you the severity of your trigger finger condition. There are 4 grades of trigger finger, each one progressively worse. 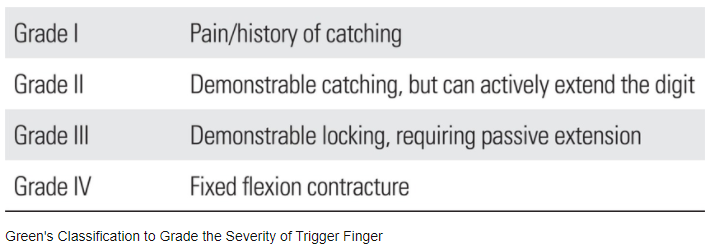
Knowing this will help you understand why some people get better, and why others need surgery.
The good news is that for most of you, surgery is not the only option for your trigger finger.
Sure you could undergo some cortisone injections but those don’t have a high success rate anyway.
Just so you know these top 5 trigger finger treatments are going to require some effort on your part.
But hey, I’d try these tips any day before undergoing the knife or needle.
Trigger Finger Treatment Number 1: Splinting
First, it is so important to make sure for at least 6 weeks, even sometimes 8 weeks, you do not experience triggering, catching, or locking of your finger at all.
Each time your finger triggers and gets stuck, well, that’s increasing the inflammation to your tendon. You want to try to avoid that as much as possible in order to get better.
The only way to do that is by splinting. And I really like the Oval 8 for that. In fact, research shows that by immobilizing just 1 joint, either your DIP, PIP, or MP, can be enough to prevent triggering.  The Oval 8 is perfect because it’s very small and fits more like a ring. Allowing you to still use your hand with daily activities without your finger triggering. The Oval- 8 comes in many different sizes so you can wear it on your DIP or PIP joint, whichever prevents your finger from triggering.
You can also use what is called an MP block splint.
These prevent you from bending at the knuckle but you’ll still be able to bend more of your finger. These little splints prevent you from contracting the swollen part of your flexor tendon through that pulley. 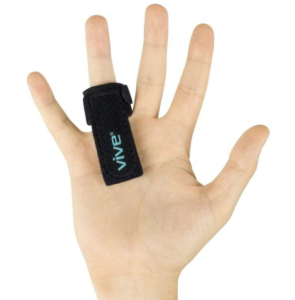
So you’ll need to pick a splint that blocks one of your finger joints in order to keep your finger from triggering.
Or you can swap out between the 2 splints. You also have the option of making an appointment with a hand therapist. They can make you a custom splint just for you. This can be very beneficial especially if you’ve tried different splints and nothing seems to be working.
Just skip all the trial and error and have the hand therapist make a splint for you.
Trigger Finger Treatment Number 2: Taping
Before I dive into explaining how to tape your finger, I have a video that I will link here that shows you exactly how to do it.
Taping can be very beneficial if you are someone that does not want to wear a splint on your finger but you still need something to prevent the trigger finger.
Keep in mind, there are several ways to tape a trigger finger. I like the option of using a harder splint, like the Oval 8, for your first couple of weeks and then progressing to tape as you transition to using your hand a little bit more. The tape is applied directly on your skin.
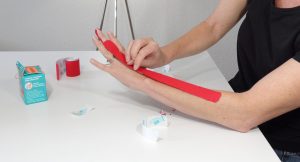
You will be using 3 pieces of tape- one to inhibit the FDP, flexor digitorum profundus, that’s the tendon that gets stuck. This piece is applied on the front side of your hand, from the fingertip down toward the elbow.
A 2nd piece is placed on the back of the hand; however, it’s applied in a facilitation starting from the elbow to the fingertip. This way the extensors on the opposite side of the arm work more to counteract the tightness of the flexors.
Then, we apply a 3rd piece of tape, known as a space correction piece located over the pulley. Stretch the center piece of tape about 40-50%, then apply directly over your pulley on your palm. You may find it more realistic to alternate between wearing a splint and taping your finger.
Whichever one feels better on your hand.
Trigger Finger Treatment Number 3: Isometric Strengthening Exercise
There is new research that shows isometric strengthening exercises performed to your FDP can stretch out your pulley. Therefore, giving a little more space for your swollen tendon to move through.
And NOT trigger.
To do this exercise, you will need to get a small towel or washcloth. You want to roll the washcloth under the finger that is triggering as shown here in the picture. In the research article, a custom block was made to place the finger at a 45 degree angle. I’m pretty sure you aren’t going to break out the wood working tools. But if you want to, then more power to ya!
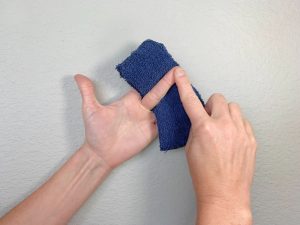
Isometric flexion exercise shown to middle finger.
For now, let’s try the towel thing by placing it under your finger at about a 45 degree bend at your knuckle.
Make sure only your MP, known as the larger knuckle closer to the hand, is flexed. Keep the DIP and PIP straight. Next, apply a moderate amount of pressure to the tip of your finger, using your other hand.
Resist the downward pressure with your trigger finger by maintaining that 45 degree bend. Hold 2-3 seconds, then relax.
Again, push down using your other hand while resisting with your fingertip. By doing this, you are contracting the flexor tendon. You’ll see the tendon contract, or bulge a little bit near the palmar side of your knuckle. That is exactly where the A1 pulley is located.
The tendon contraction will stretch this pulley out to give your finger more space when you flex.
Caution: this should NOT cause any pain or triggering!
Of course, you can do this on any finger that is locking up. Watch the video to see how it’s done. Again, hold the contraction for about-2-3 seconds. Repeat 10-15 repetitions, 3 times a day.
Trigger Finger Treatment Number 4: Massaging the Web Spaces Between your Finger
This treatment is one of my favs because you can do this anywhere! It includes massaging the muscles and web space on both sides of the finger that is triggering. To do this, you want to spread your fingers far apart on both hands. Next, interlace your fingers together.
Make sure to move your fingers all the way in between the finger web space once as shown. 
Allow your fingers and arms to relax. To add more massage or pressure, you can place a little ball in your palm as you interlace your fingers.
Massage the ball up and down over your palm. Making sure to massage the web spaces of your fingers.
You can even take an ice cube and do a little ice massage with this exercise or put the ball in the freezer. Then place the cold ball over your palm, interlace those fingers, and just gently relax.
Don’t forget to breathe. Stay in this position for 10- 30 seconds or longer. Try incorporating this technique 2-3 times a day.
Trigger Finger Treatment Number 5: Pencil Exercise
For this trigger finger treatment, you will want to go grab a pencil, a chopstick, or even a small paint brush. With this exercise, you will start introducing a little bit of active motion to your finger.
But don’t fear, your motion will be protected and blocked by your pencil!
Typically, your finger will trigger only when you flex into a full fist. We don’t want that, hence why we are using the pencil to block the full fist.
What you are looking to do with this exercise is prevent your finger from becoming too stiff but also get your tendon to glide smoothly through the pulley. Interlace, or weave the pencil, chopstick, or paintbrush, whatever it is that you’re using between your fingers.
The pencil should be on the palm side of the finger that is triggering but on the back side of the adjacent fingers.
You can do this to any finger…
but you may need to hold the pencil especially for your small finger.
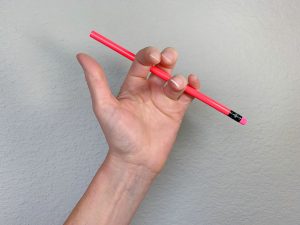
Pencil exercise shown here for middle finger or small finger.
Once you have the pencil comfortably interlaced between your fingers begin lightly and actively bending your finger over the pencil. The pencil will block you from moving too far.
The key is to only flex your finger with about 50% force of what you normally would do. Take it easy, you don’t want to be forcefully pulling too hard over the pencil. As you can see, this allows your DIP and PIP to move. Providing a little bit of movement to your tendon so that you don’t get stiff.
Make sure you straighten your finger all the way so you can get a good stretch. Contracting the extensor tendons on the back of your hand can help counteract the tightness of your flexors.
Again, lightly curl your finger over the pencil, keep your wrist back slightly. Repeat this trigger finger exercise 10-15, a few times a day.
Conclusion
Try not to get overwhelmed by these trigger finger treatments.
Splinting and taping are most beneficial to use when you are active with your hands. Which is pretty much all the time for many of you!
The two exercises and massage suggestions should only take you 5 minutes a day. Although these top 5 treatments for your trigger finger may take several weeks of persistence.
But the real satisfaction will come when you can use your hand again without the fear of locking or catching.
Want to try one of the Oval-8’s? You can find those in my store here. Or you can try one of the other splints that block your knuckle here. You like the look of taping huh? Get the Muscle Aid tape I use here.